Marketing Your Book with Facebook Ads (Part Two of Four). As I mentioned in part one of my Facebook Ads case study, I suggest you order the following books: The Ultimate Guide to Facebook Advertising and Killer Facebook Ads. In this post (part two of four), I will walk you through the process of setting up that first Facebook Ad.
If like me, you’re not savvy with Facebook Ad, start with a small little test. This is what Perry Marshall recommended in The Ultimate Guide to Facebook, and I agree. It’s the perfect way to stick your toe in the Facebook Ads waters without drowning. And by drowning I mean, not getting hit with a high cost charge to your credit card on your first ad.
Note: You can click on the images below to enlarge them, that way you don’t have to squint.
Set up the Ad
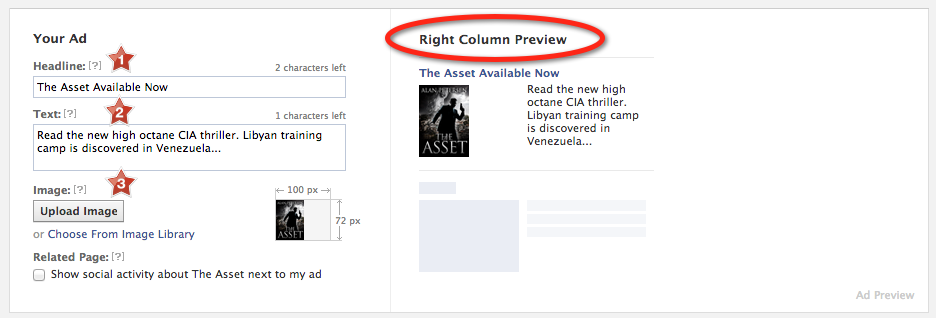
The first thing you’ll need to do is setup the copy for your ad. You’ll need to do three things here: Headline, Text, and image.
The maximum characters for your headline and text is 25 and 135, respectively. And it was too tough! Even though this was just a test ad, it took me awhile to finally get my blurb down to 135 characters. It might not seem like it, but it was a challenge.
Image. I used my book cover. I might use a web banner I had designed in future ads, but it makes sense to use your book cover image. If you have an eye-catching, professionally designed book cover that stands out.
You prepare your ad on the left column of your Facebook Ads Dashboard and on the right column, you can preview what your ad is going to look like.
Choose Your Audience
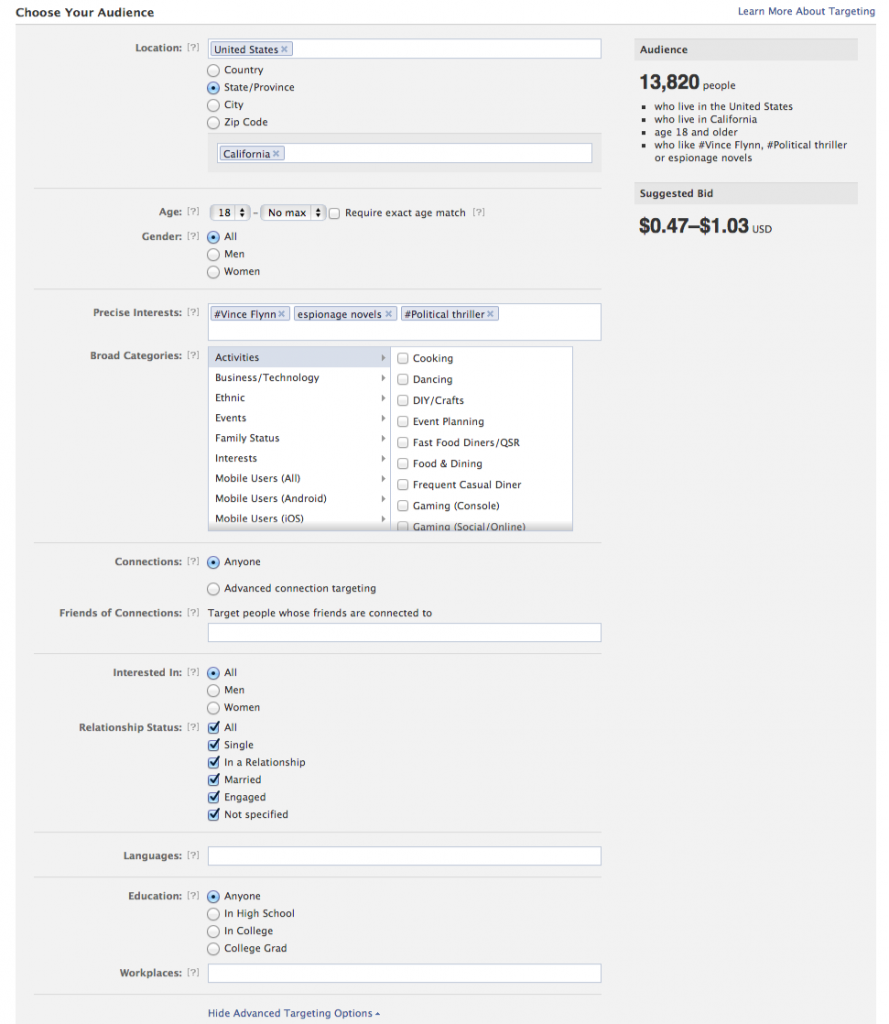
In this section is where we’ll target the folks we want to see and click on our ad. Since this was just a test ad for me (and it should be for you too, if you’re new at this), as recommended by Perry Marshall, I went small… very small. I just targeted people in the state I live in (California). Eighteen years of age or older. And I just chose three precise interests.
Facebook culls this data from your Facebook timeline, your interests, your job title, your educational institutions, things you’ve liked, groups you’ve joined. All that stuff you do on Facebook… well, they put it all in a database so they can sell uber targeted ads. I chose thee interests that would target people who might enjoy reading my book.
After I targeted my audience, Facebook shows the audience potential. 13,820 people fell into that category for me to target with my ad.
As you can see Facebook listed a suggested bid of $0.47 to $1.03. In theory, the higher you bid within that range, the better your odds of having your ad show up in front of your target audience. Whatever you bid is what you’ll be charged per click (every time a person clicks on your ad, that is the amount you’ll be charged).
In the next section, we setup our bids.
Campaign, Pricing and Schedule
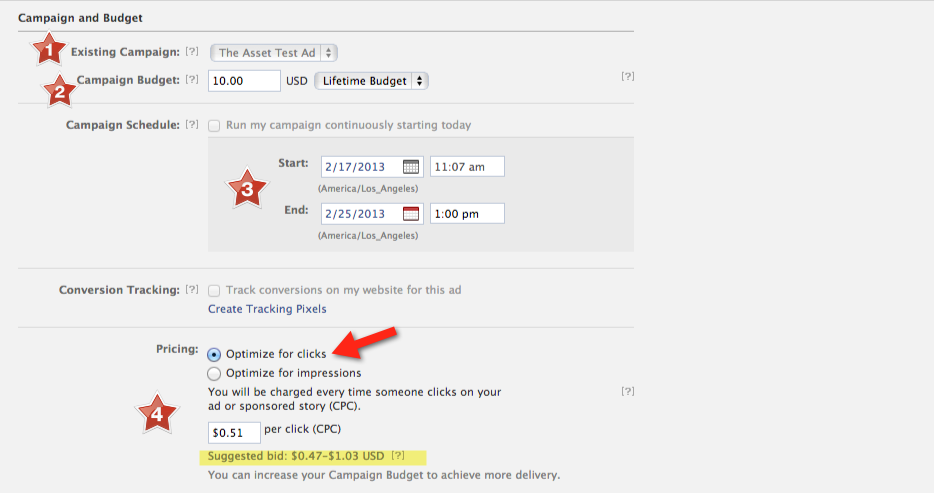 Here is where we bid on how much we’re willing to pay for each click. Here is where it can get costly if you’re not careful.
Step 1, select you ad, if this is your first ad, it will be the only listed in the drop down, so that part is easy.
Step 2, select your campaign budget. This is probably the most important step of this whole process. If like me, you’re new to Facebook advertising, you want to setup a “lifetime budget” for your campaign. That way if your ad is a stinker, you’re not out next month’s mortgage payment. Since my first ad, is basically just a test ad, I setup a lifetime budget of $10. The most my credit card will hit with for this campaign is $10. So no worries there. It gives me the flexibility to test this out stress-free.
Step 3, setup your ad duration I went with five days. Seemed like enough time to really kick the tires. What this does is put an end to your campaign. If I blow through the lifetime budget for this campaign in an hour, then the campaign would end in then and there, since my $10 lifetime budget has been met. If not, it will continue to run until the end date input in this step.
Step 4, make sure you check “Optimize for clicks”. You want your ad to be optimized for clicks and impressions. What that means is you’ll only be charged your bid amount when someone clicks on your ad, not just when it shows up on their Facebook. If you set this for impressions, if the ad shows up on their screen ten times, you would pay for each one of those ten times (impressions). Even if they do nothing. You want to pay, only if they click on the ad.
In my test ad, Facebook suggested bidding between $0.47 to $1.03. I just went a few cents over their minmum suggested bid amount as suggested in the Ultimate Guide to Facebook Advertising. So I bid $0.51 per click.
That means every time someone clicks on my ad, I’m charged $0.51 by Mr. Zuckerberg.
Showtime
And that’s it. My ad was ready. It’s very simple to setup a Facebook ad, especially for testing purposes.
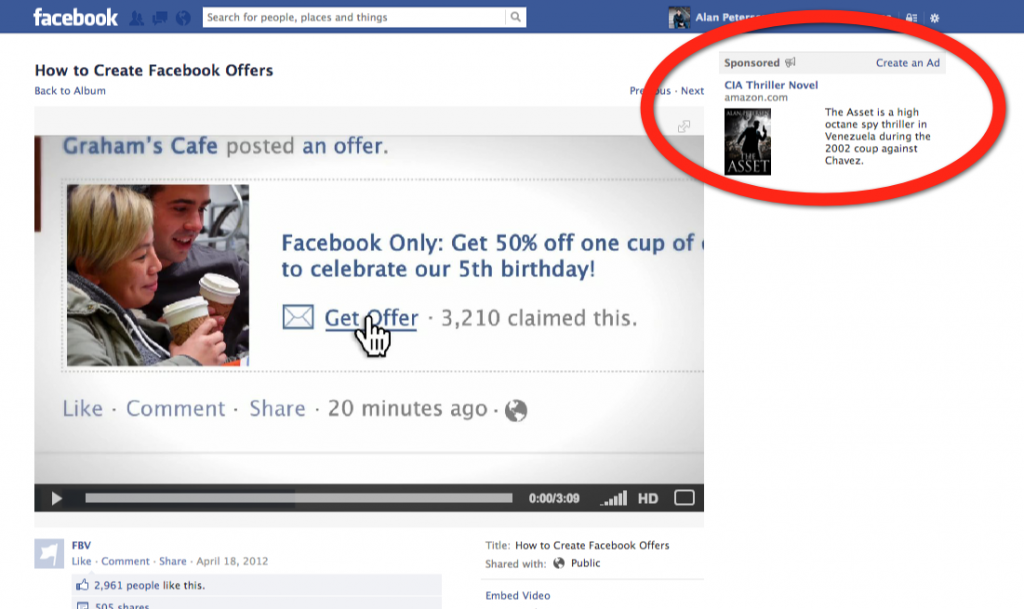 Facebook has a preview option. You click on that and you can see what your ad will look like when it’s displayed on someone’s Facebook.
In the next blog post, I’ll show you how my test ad did during its five day run.






 My name is Alan Petersen I write mysteries and thrillers. You can check out my Amazon page